Creating an automation script
To create a new automaton, click the Logic tab. Add an automaton,
by clicking on the plus sign.
Fill in the following fields:
- name - name of the machine;
- description - detailed characteristic of the machine, to be filled in if necessary; description - detailed characteristic of the machine, to be filled in if necessary. if necessary;
- model - select the model of the object, for which you will form the automation scenario. automation scenario. If the automaton will include interaction between multiple objects, select the models that correspond to these objects;
- import - possibility to import the ready automaton as a file or by link. as a file or by link.

Click the Create button. A new automaton will open in front of you with minimal
set of elements in the working area.
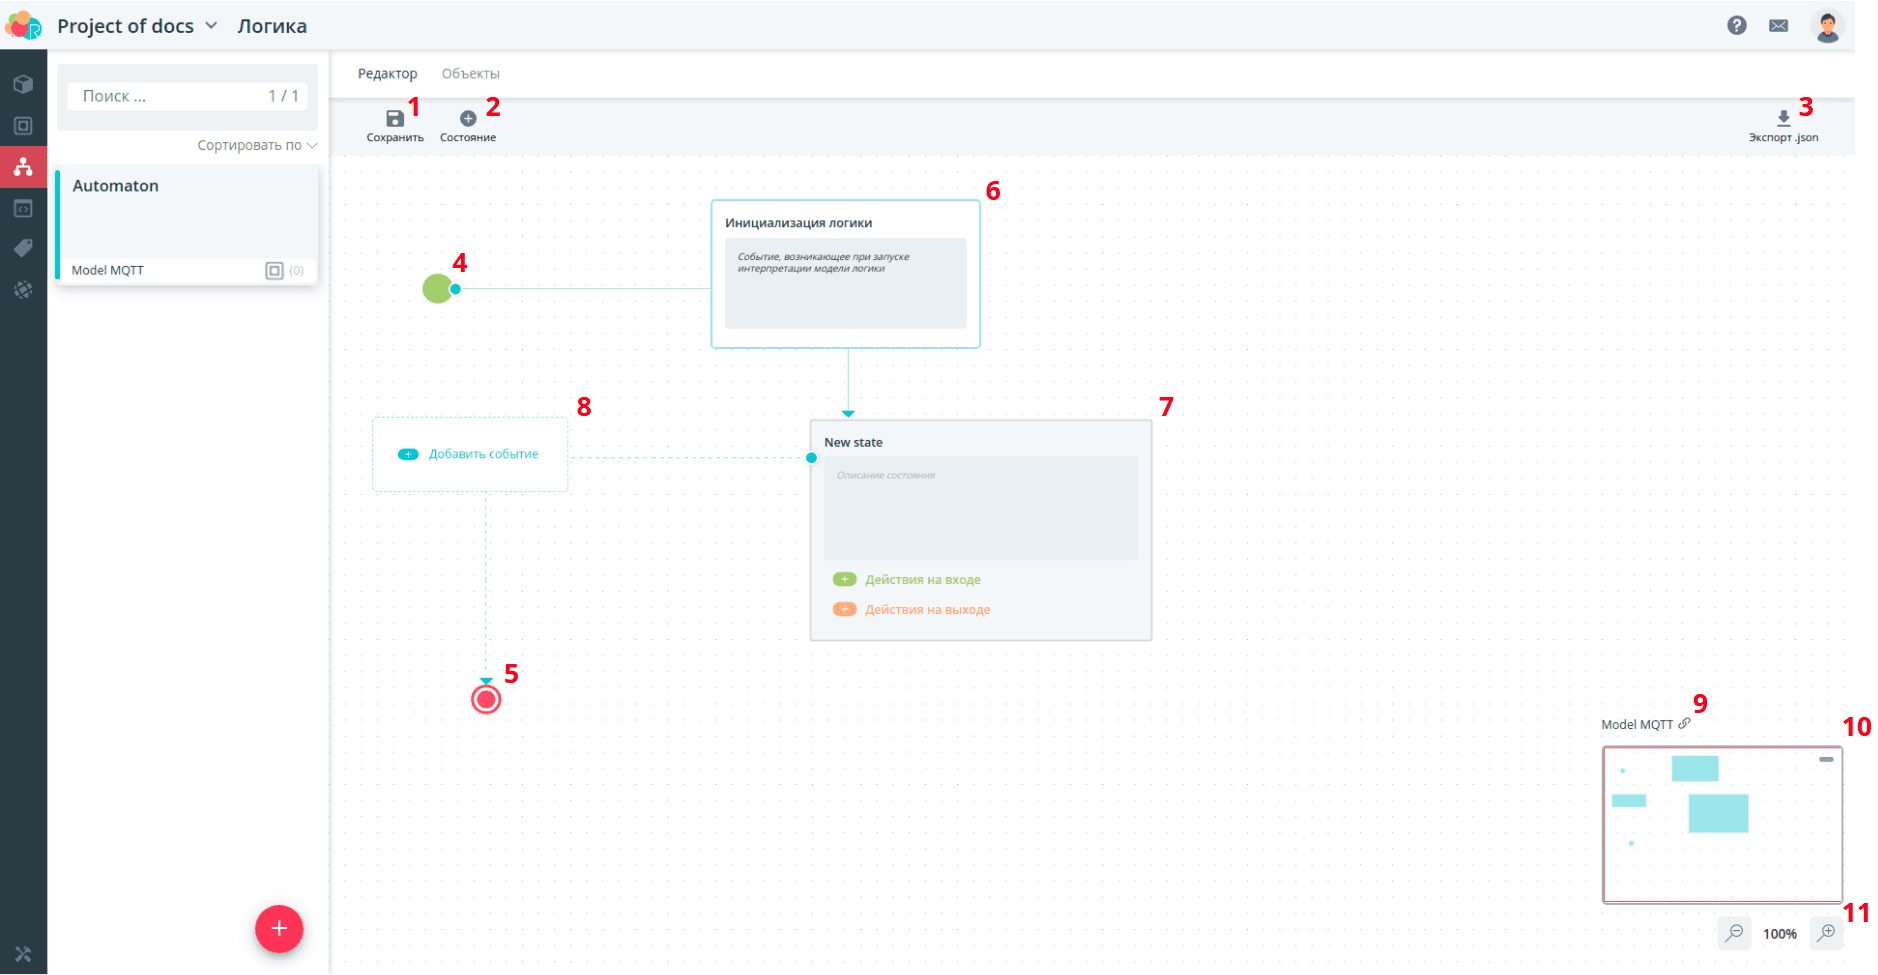
-
Save: Save the changes to the automaton. If the automaton was previously run on objects, it will continue to run in the previous version. In order for the changes to take effect, the automaton must be restarted on the object
-
State: Add new state
-
Export .json: Export the automatism to a JSON format file
-
Script execution start designation: Used in any automaton
-
Scenario execution end designation: May not be used if the automaton assumes cyclic execution without stopping. the automaton assumes cyclic execution without stopping
-
Scenario initialization state: Present in any automaton
-
State: It specifies the actions to be performed on the input and output
-
Transition: It specifies the event (always) and condition (optional) under which a transition from one state to another occurs. under which the transition from one state to another takes place
-
References to the models used in the automaton
-
Minimap: A small auxiliary window showing the whole automaton. Moving around the automaton can be done either through minimap or directly through the workspace. directly through the workspace. Minimap can be hidden by clicking on the button in its upper right corner. its upper right corner
-
Buttons for zooming
States
Press the State button to add a state.
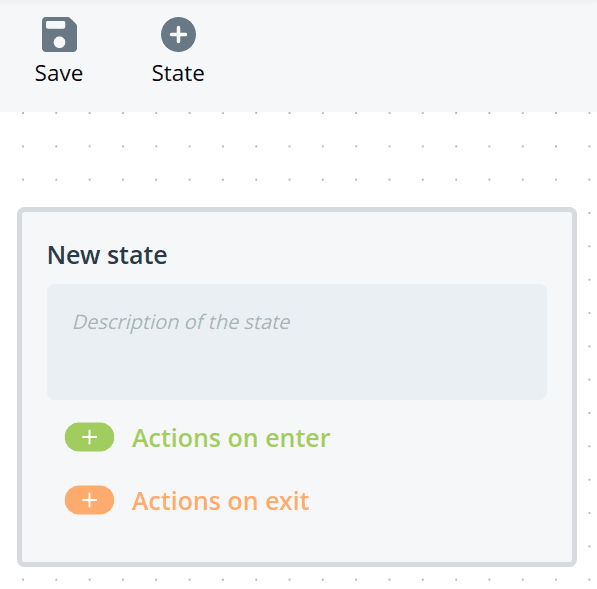
State Interface
- Entering the state
- Exiting a state
- Deleting a state
- State name
- Description of the state
- Adding actions to be performed when entering the state
- List of selected input actions
- Adding actions to be performed when exiting the state
- List of selected output actions
- Resizing the state
To add an action to a state, define when it should be
to be performed: at the input or at the output. After that, click on the corresponding
button to open a complete list of actions according to the defined model.
This list includes both the actions defined for each model and the commands you have added.
as well as commands that you have added. From this drop-down list, select one
or more commands to be executed on the input or output of the
state.
💡
Actions on entry to a state are performed when transitioning to that state
from any other state. Actions on the exit of a state are performed when
transitioning from this state to any other state.
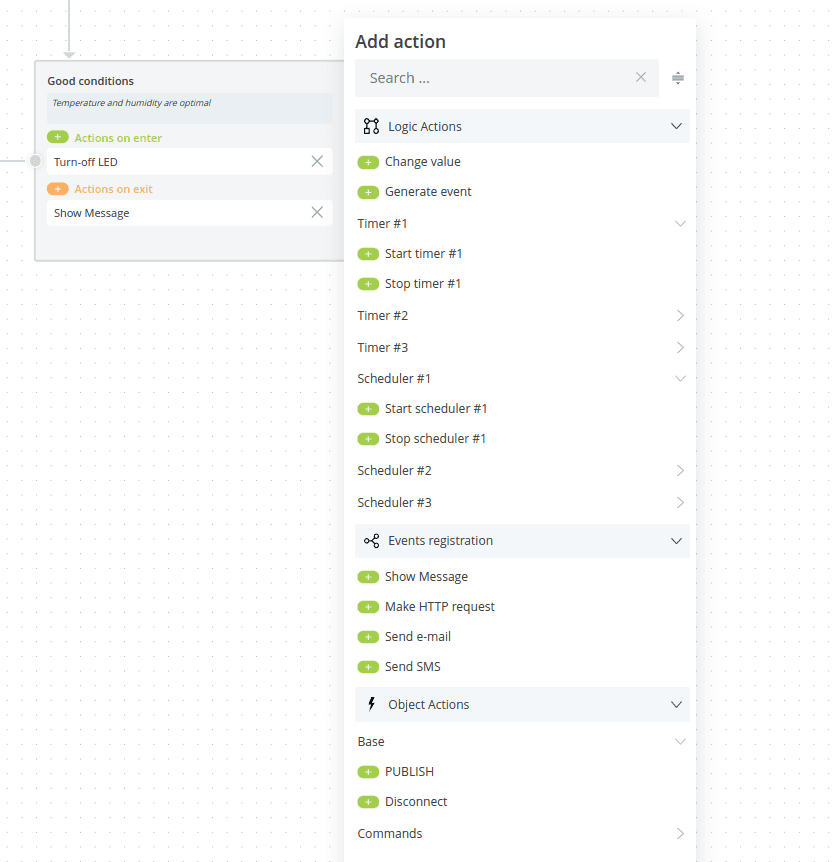
Actions are divided into three semantic groups:
- Auto Actions - basic actions of each automaton:
-
Change value
-
Generate event
-
Timer No... - timer control commands:
- Start timer no...
- Stop timer no...
-
Scheduler No... - scheduler control commands:
- Start scheduler #...
- Stop scheduler No...
- Registration of events - actions aimed at fixing the moment of of entering/exiting the state:
- Show message
- Send HTTP-request
- Send e-mail
- Send SMS
- Actions of the object - commands that can be sent to the object:
- Basic - commands present in the model by default, differ depending on the protocol.
All the other sections you see in the actions are subsystems with the
commands that you have created in the model.
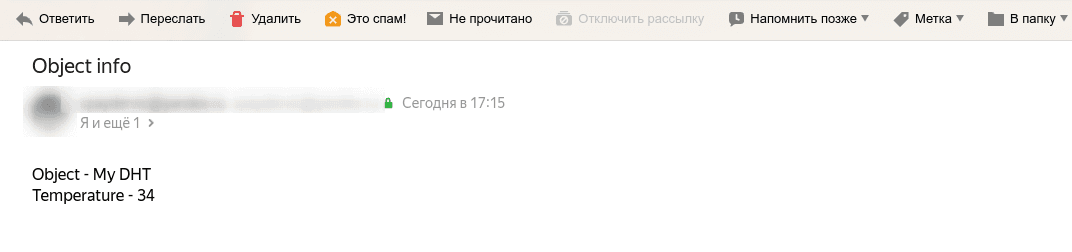
Show message
Sending messages allows you to keep track of the current changes occurring during the
logic execution. If you add this command to enter any state,
the system will send the necessary notification when the object enters this state.
notification. It will inform that a certain event has occurred,
that the object is now in that state. As a result.
regular sending of notifications, you will always be aware of the status of the control process.
of the control process.
Generate messages
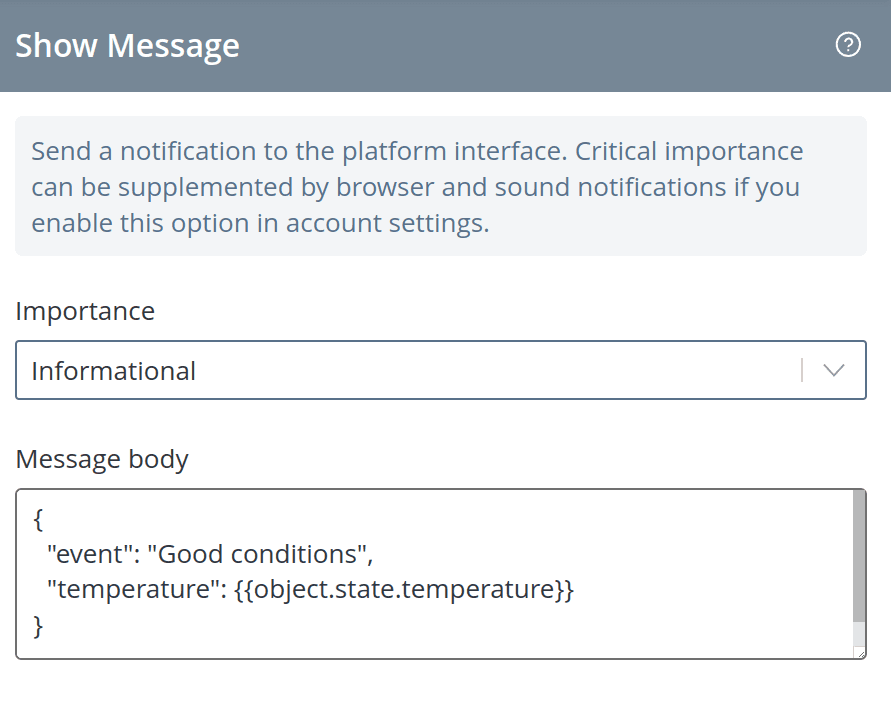
To generate a message, add the Show Message command to the status.
A sidebar will appear on the right side, where you can select the importance level of the message:
-
Informational;
-
Important;
-
Critical.
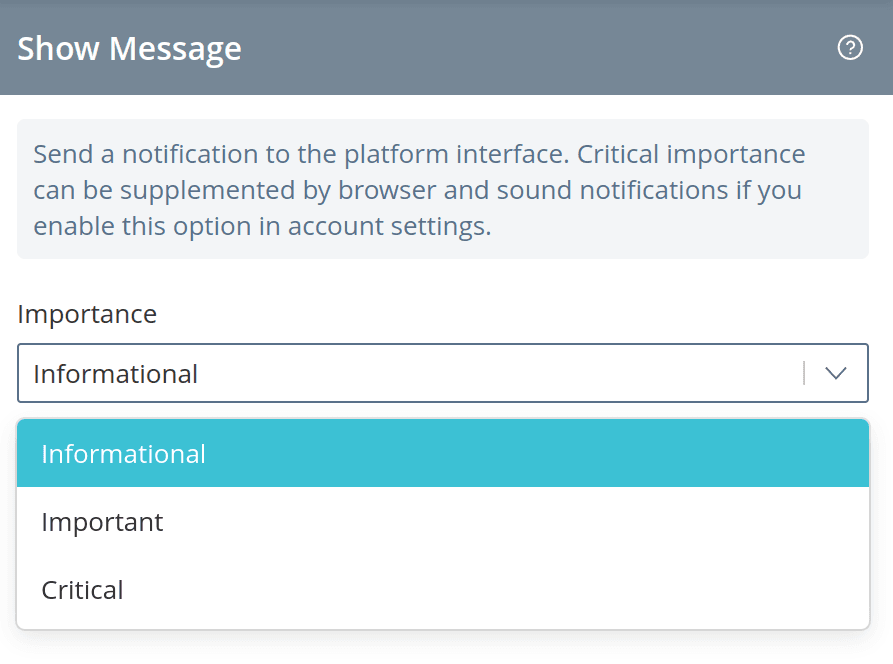
If you need to inform that a transition or event has occurred,
then it is sufficient to specify the message as informational. If the notification
plays a more significant role, for example, some deviation or violation is registered, then it makes sense to specify the message as informational.
a deviation from the norm or a violation, it makes sense to increase the importance of the message.
Next, fill in the content of the message. The text of the message is formed in an arbitrary form, its format is not strictly regulated.
format is not strictly regulated. However, it is desirable that it be
short and informative for convenient display on the platform.
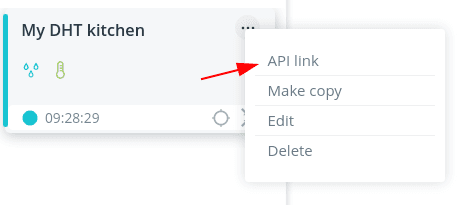
In addition to descriptive information about the event, the message can also contain specific current values of parameters.
send specific current values of parameters. All values that can be
are specified in the API link of the object.
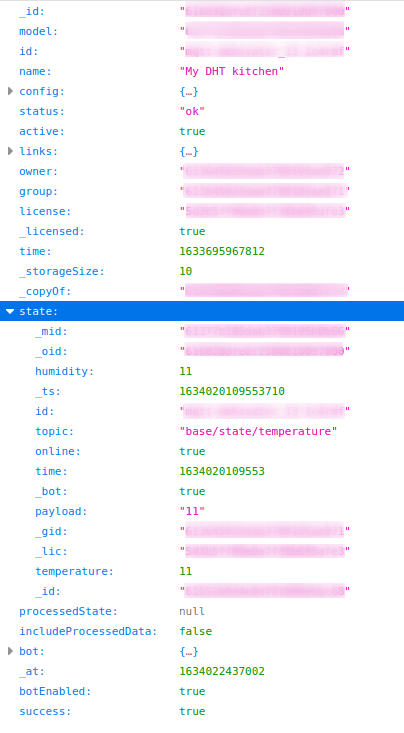
In this case, the following construct is formed in the message
{{{object.<...>.parameter_id}}, where<...> - nesting subsystems, in which the parameter is located, are specified
with a dot;parameter_id - identifier of the parameter.For example,
{{object.state.humidity}}, {{object.name}}, etc.Then the content of the notification can be formed as follows:
{
  "event": "Good conditions",
  "temperature": "{{object.state.temperature}}"
}
In the text of the message, instead of
{{{object.state.temperature}} the current
value of the parameter with the identifier temperature will be substituted for {{object.state.temperature}}.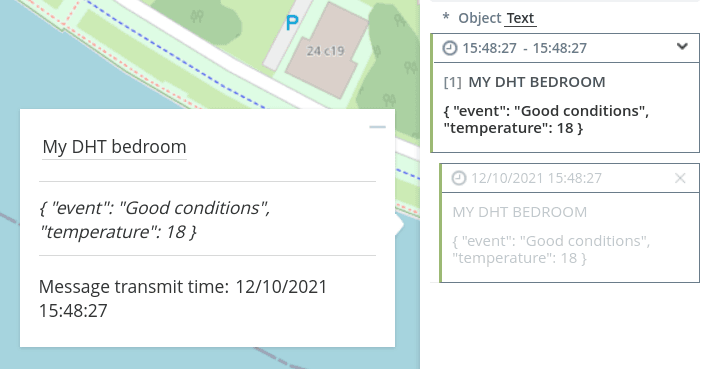
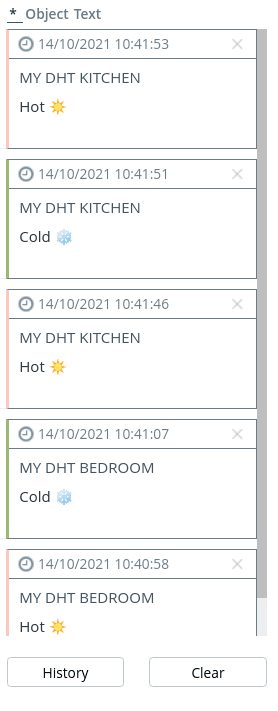
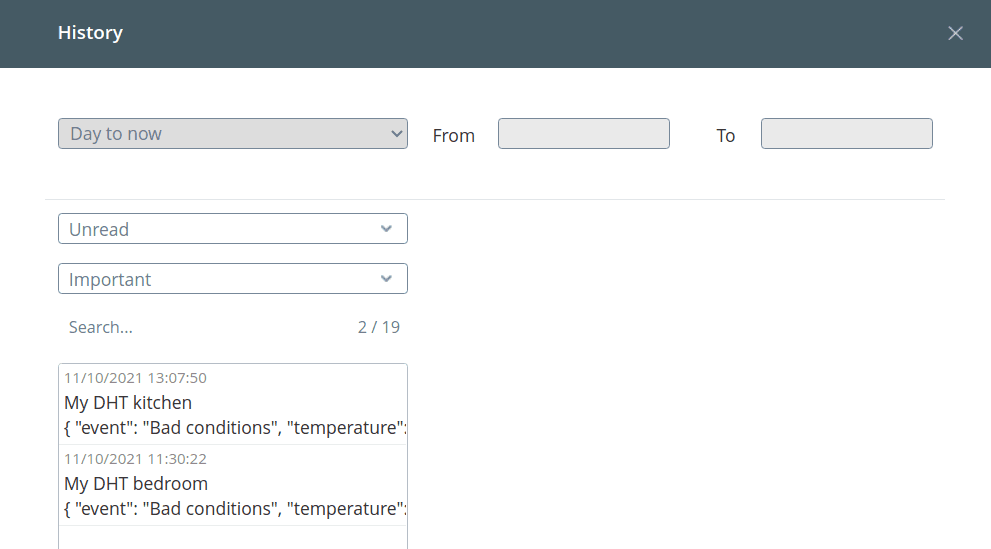
Display and view messages
Sent messages are shown in the right sidebar of messages.
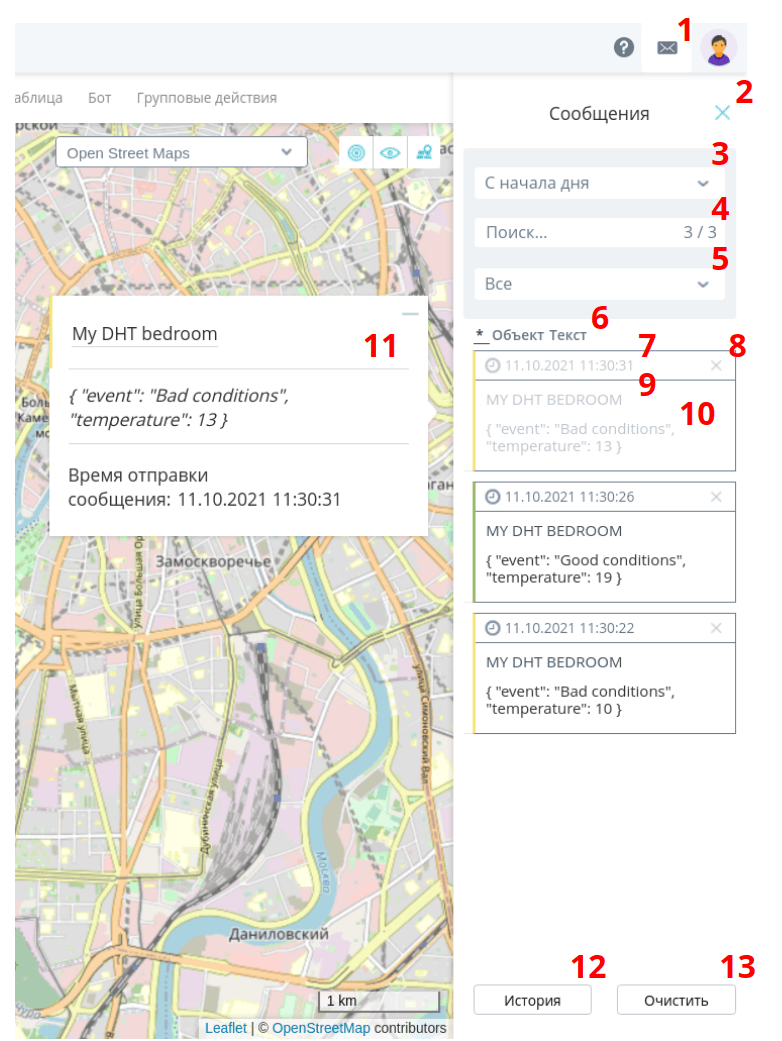
- Button to open/close the message pane. If there are unread messages looks like this

-
Button to close the message panel
-
Filter by time of receipt: you can display messages that have been received From the beginning of the hour, From the beginning of the day, From the beginning of the month and From the beginning of the year. year**
-
Search bar, you can search both by object and by content. messages
-
Importance filter: you can display messages with the level of Critical, Important and Information. Each level is identified by its color: red, yellow or green, respectively
-
Message grouping
-
Date and time when the message was received
-
Hiding a message from the list
-
Name of the object to which this message refers
-
Message content
-
If you click on an individual message, it will be fully displayed just to the left of the sidebar, marked as read and disappear from the list. left of the sidebar, it will be marked as read and will disappear from the list of messages. messages
-
message history
-
Clearing the message list
💡
When new messages appear that do not pass the filter,
the input field is briefly highlighted in red.
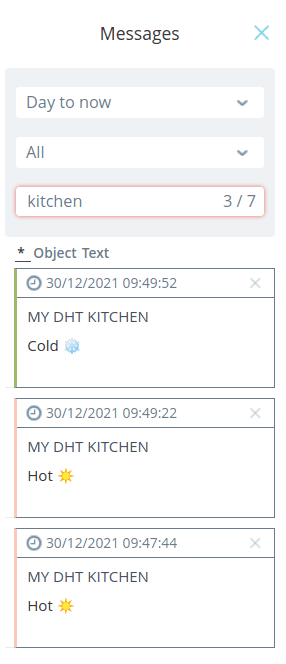
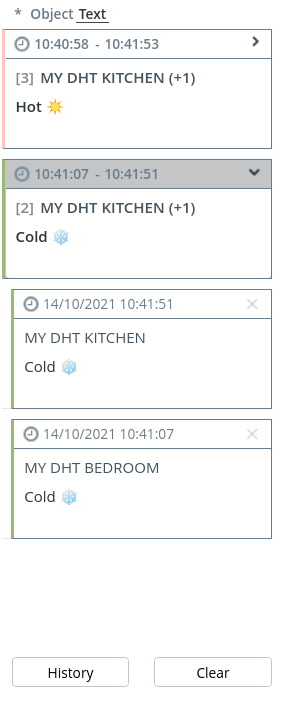
Options for grouping messages:
- * - no grouping, messages are displayed in a full list;
- Object - for each object all alerts will be collected in a single group. Before the name of each object the number of messages in the group is displayed in square brackets. messages in the group;
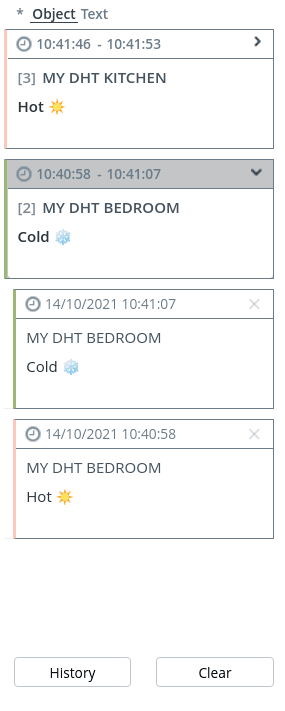
- Text - messages are grouped by content. Notifications form a separate group if they have the same text. After after the name of the object, the number of objects with the same text is displayed in parentheses. notifications with the same text are displayed in parentheses after the object name.
💡
To work with Critical level messages, there is an option to to enable
additional alerts in the Settings
.
All received messages are saved in the history. First of all, specify the period,
for which you want to display the notifications:
- From the beginning of the hour;
- From the beginning of the day;
- From the beginning of the month;
- Begin of Year;
- Interval - specify the time From and To.
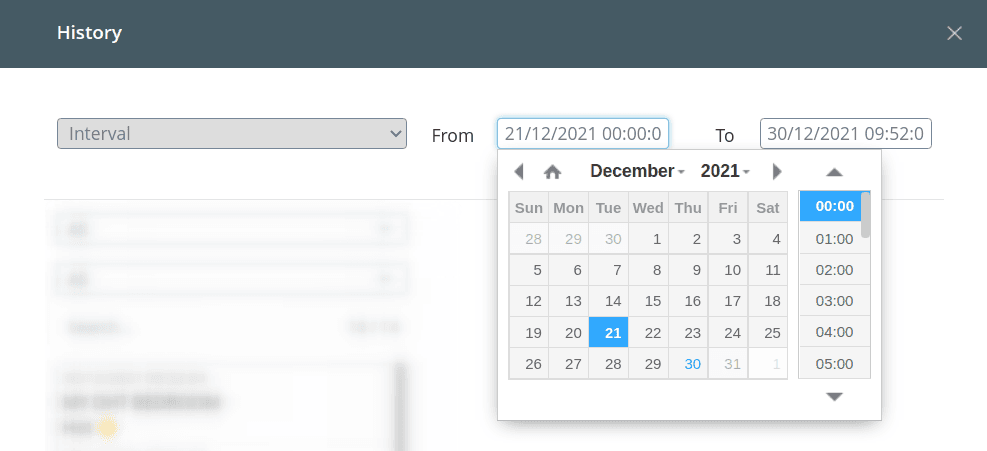
After that, you can set a filter by read status (Read,
Unread) and importance (Critical, Important,
Information). There is no grouping of messages.
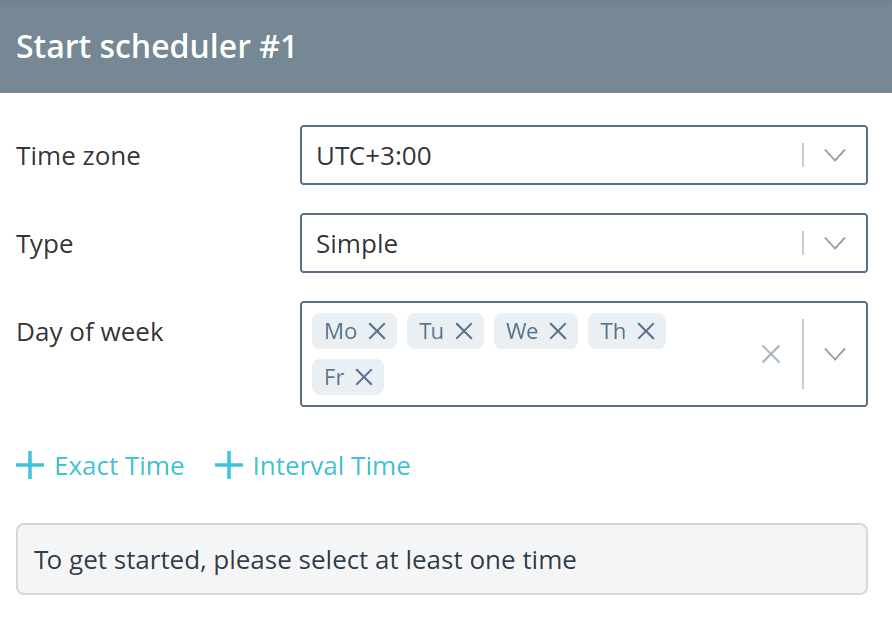
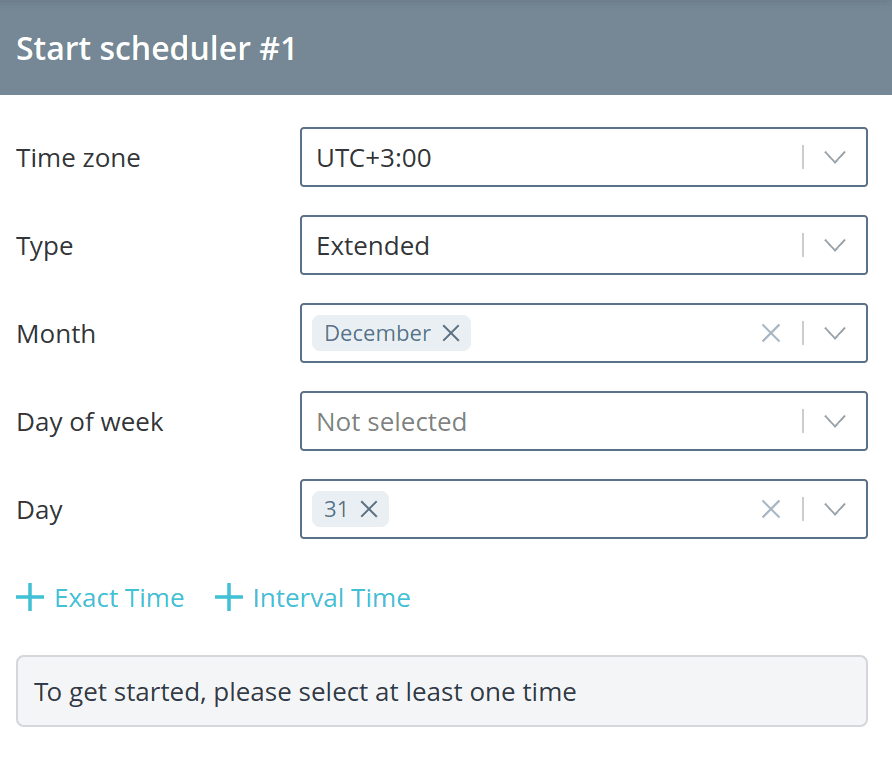
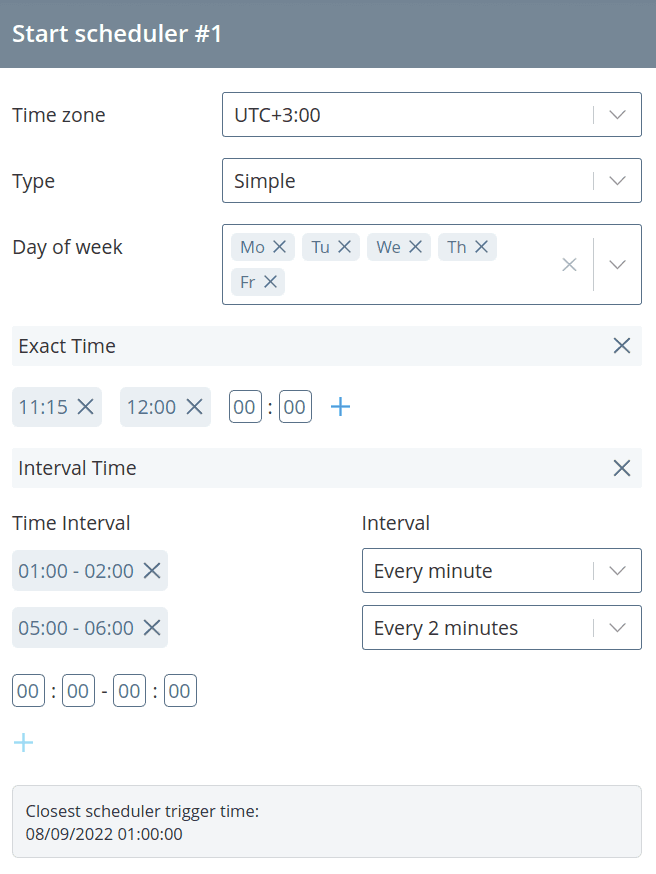
Start/stop scheduler #...
Running the scheduler allows you to configure an event to trigger at a specific
time. To set the date and time, add the following command to the state
Start Scheduler. A sidebar will appear on the right side of the screen, where you can fill in the following fields
the following fields:
-
Time zone - filled by default with the time zone configured in the personal personal cabinet of the platform, can be changed;
-
Type:
-
Simple - only day of the week is selected;
-
Advanced - select month, day of week, day.
-
-
Month (for advanced)
-
Day of the week
-
Day (for advanced)
| Simple | Advanced |
|---|---|
Next, select the trigger time. The exact and interval times are set independently of each other and work in parallel.
are set independently of each other and work in parallel:
-
Exact time - the scheduler will trigger at a certain time (e.g. if you specify 13:15, then the Scheduler triggered event will occur at exactly 13:15:00)
-
Interval time - allows you to select a time interval and periodicity of triggering within this interval (for example, if you choose the interval from 13:00 to 14:00 and the interval Every 2 minutes, then the scheduler will trigger at 13:00:00, 13:02:00, 13:04:00, ...)
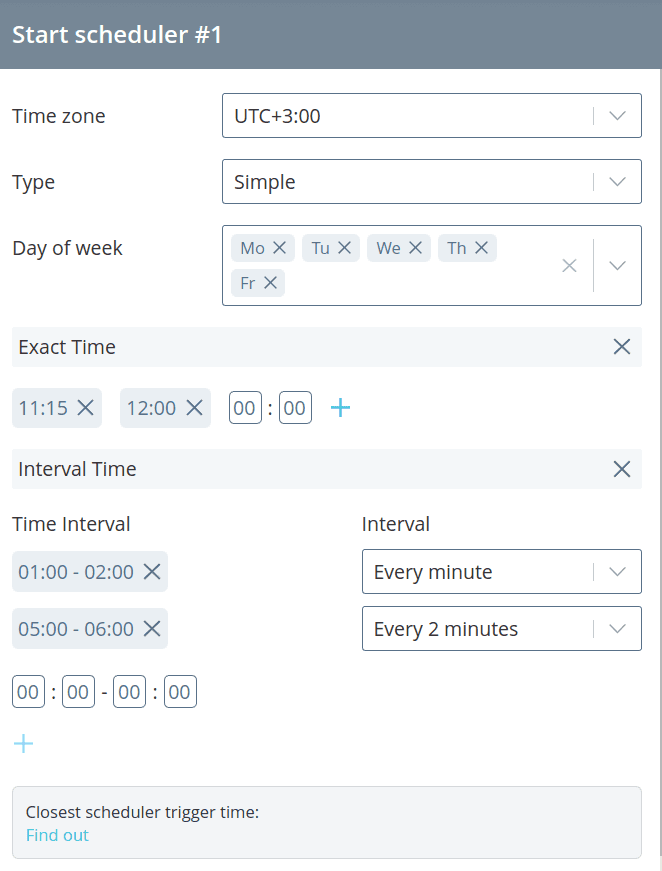
To check the closest scheduler trigger time, click on
Recognize. This will help you to check whether the complex
scheduler.
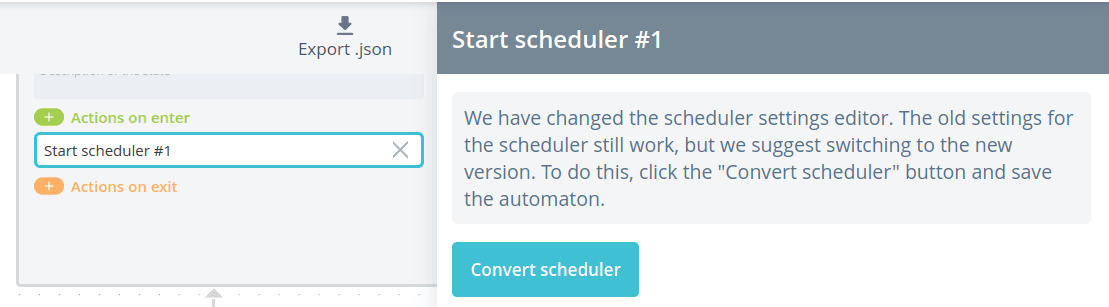
💡
If your automations had previously created schedulers in the old interface,
they will continue to work unchanged, but will not be displayed in the current
interface of the scheduler settings. Therefore, it is recommended to perform the conversion
to the new interface by clicking the Convert Scheduler button.
Every time a time occurs that fits the pattern set in the
scheduler, a Scheduler triggered event will be generated, which can be used in transitions.
can be used in transitions.
The scheduler's work applies to the whole automaton, not only to the state in which it was started.
in which it was started. This means that it will be triggered regardless of whether the automaton
whether the automaton is currently in the state where you started the scheduler or in any other state.
any other state.
The Stop Scheduler command stops the scheduler from running.
Start/Stop Timer No...
Start timer allows you to configure an event to trigger after a certain time.
specified time. To set the time, add the command to the state
Start Timer. A sidebar will appear on the right side of the screen, in which type a number,
the number of seconds the timer should be triggered.
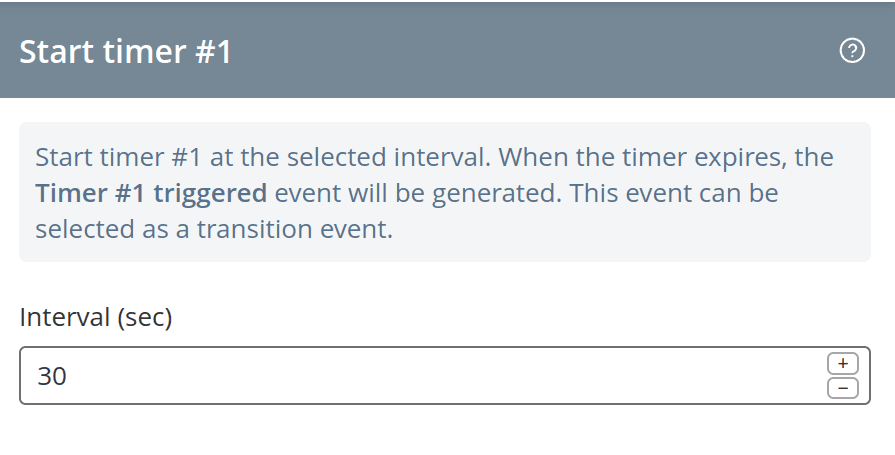
When the time specified in the timer expires, a Timer has been triggered event will be generated, which can be used in the
timer** event will be generated, which can be used in transitions.
The timer operation, like the scheduler operation, applies to the whole automaton, not just to the state it was in.
not just the state in which it was started. This means that it will be triggered
regardless of whether the automaton is currently in the state where you started the
timer or in any other state.
The Stop Timer command stops the timer from running.
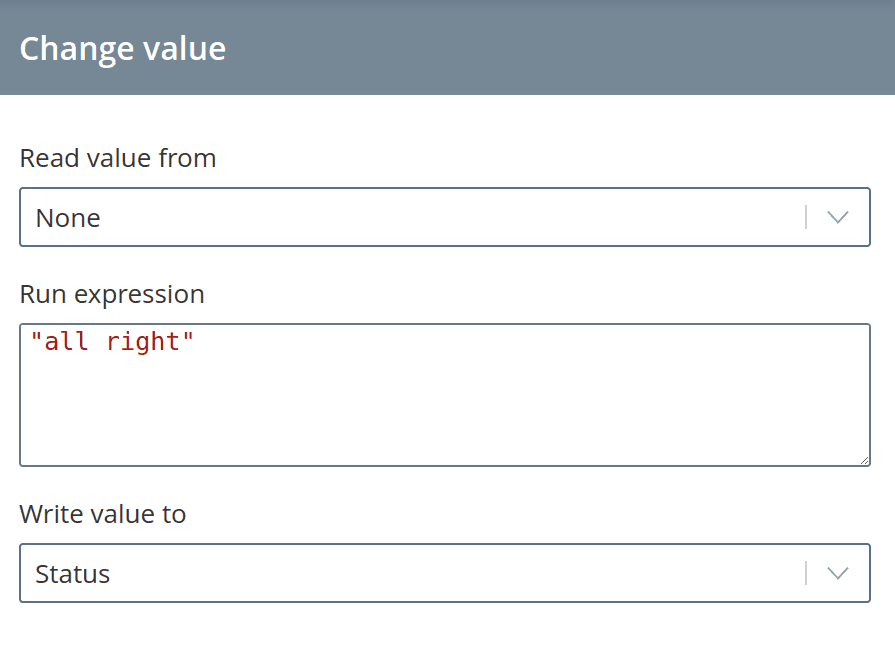
Change value
If during execution of the automaton logic it is necessary to change or populate
value of some parameters of state, configuration or status, use the Change value command.
command Change value.
This command provides the following functions:
- read a parameter from a configuration/state/status and write it in its original to another parameter from the configuration/state/status;
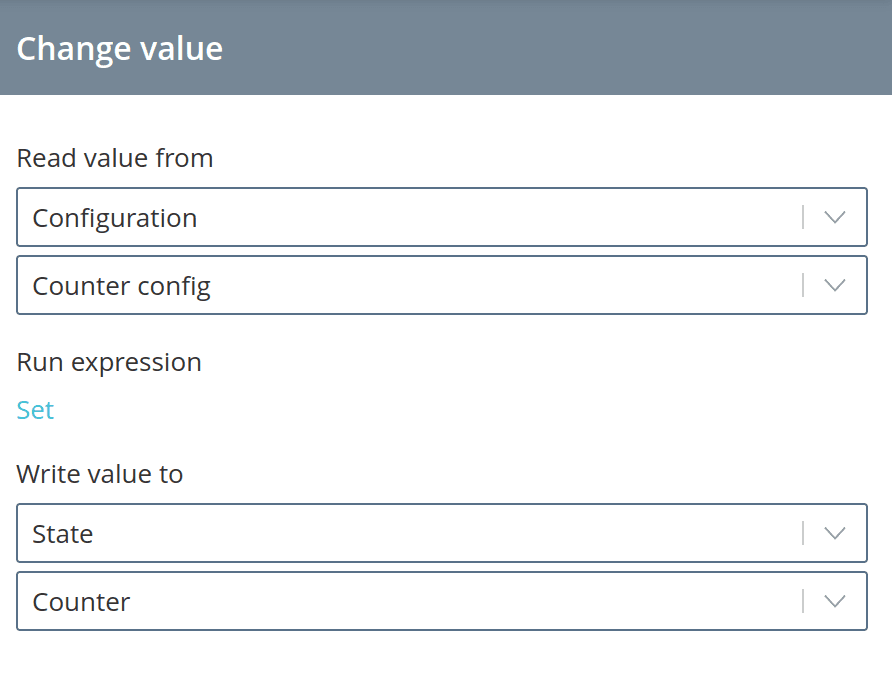
- read a parameter from the configuration/state/status, perform some expression on it some expression (the read value is used in forming the expression in the form of $value variable) and write the obtained value to the parameter from configuration/state/status;
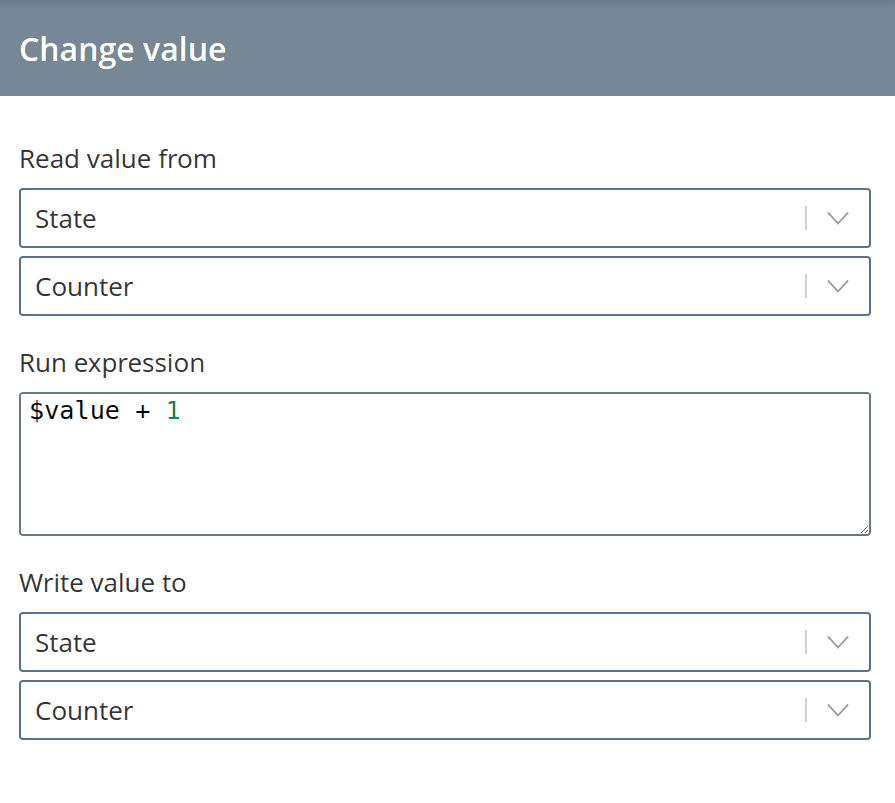
- define some value in the expression and write it to a parameter from the configuration/state/status.
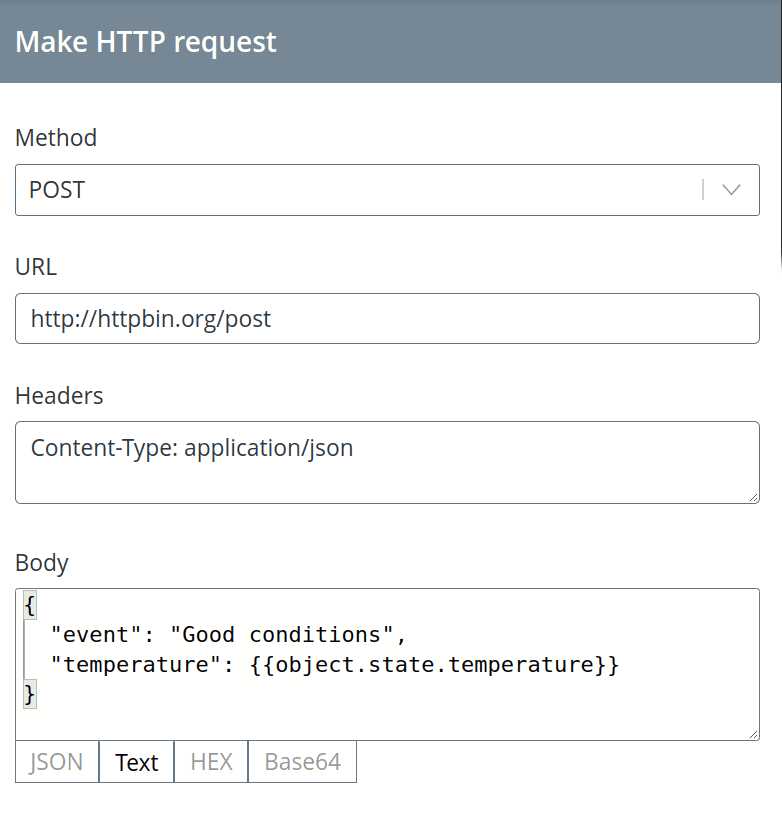
Send HTTP Request
If during the execution of the automaton logic it is necessary to transfer or, on the contrary,
load data from a third-party service (mobile and web applications, CRM and ERP-systems, etc.).
ERP-systems, etc.), use sending HTTP-requests. Such a request
implies sending information to an external service by using HTTP protocol technologies.
using HTTP protocol technologies.
💡
There is a limitation on sending HTTP requests: one request per second from
one object. object.
To generate a request, add the Send HTTP Request command to the state.
A sidebar will appear on the right, where you fill in the following fields:
-
Method of request:
-
GET - retrieve data from the specified resource;
-
POST - sending data to the resource;
-
PUT - placing data on the resource in its entirety;
-
PATCH - similar to PUT, but applies only to some fragment of data;
-
DELETE - deletes data from the resource;
-
-
URL - address to which the request will be sent;
-
Headers - allow to take into account the peculiarities of data presentation and transmission to the server. to the server. Authorization parameters, language of the message content, message formats required on the client or server side can be set here. message, message formats required on the client or server side, information about the connection, etc.;
-
Message Body - data itself. This field is optional.
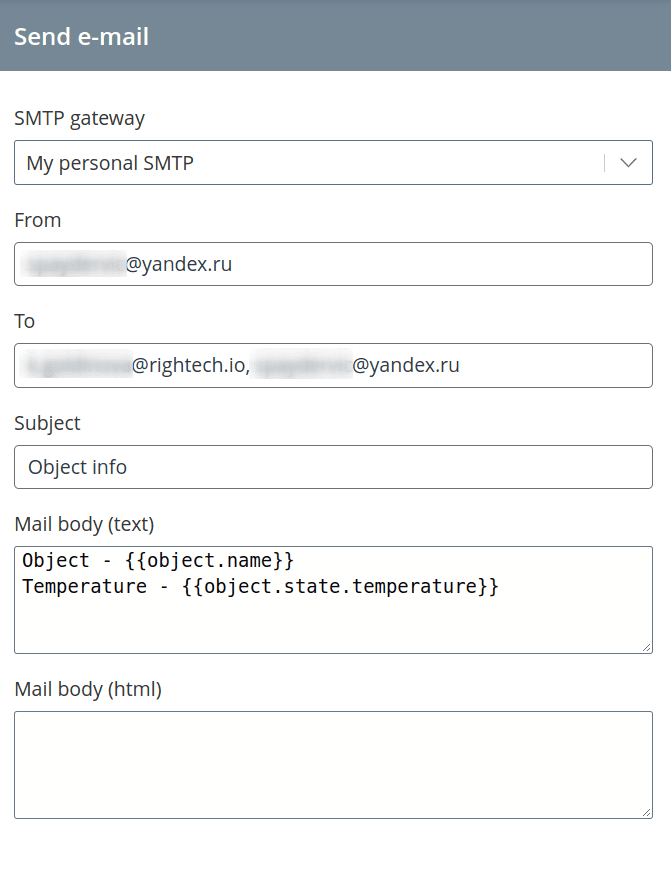
Send e-mail
If in the course of execution of the automaton logic it is necessary to send e-mails
to certain addresses, use send e-mail. In order to
customize the sending parameters, add the Send e-mail command to the state.
A sidebar will appear on the right side, where you should fill in the following fields:
-
SMTP server - the outgoing mail server from which to send the e-mail via SMTP protocol. This field is mandatory; For details about creating an SMTP server>>\>>
-
Sender - the address from which the email will be sent;
-
Receivers - address to which the mail will be sent, you can specifyseveral addresses separated by commas;
-
Topic - the subject of the e-mail;
-
Content (text) - message text;
-
Content (html) - message text in HTML markup. If this field field is filled in, the Content (text) field is ignored.
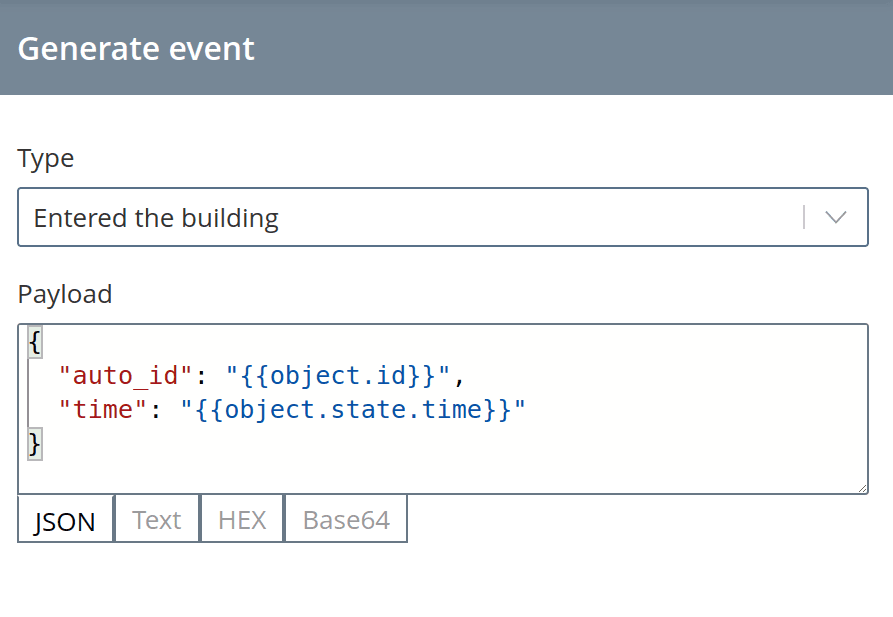
Generate event
To generate an event in the automaton that you have created in the model,
add the Generate Event action. Fill in the following fields:
- Type - select one of the events created in the model;
- Payload (Data) - additionally you can specify some information about the event and process it. and process them.
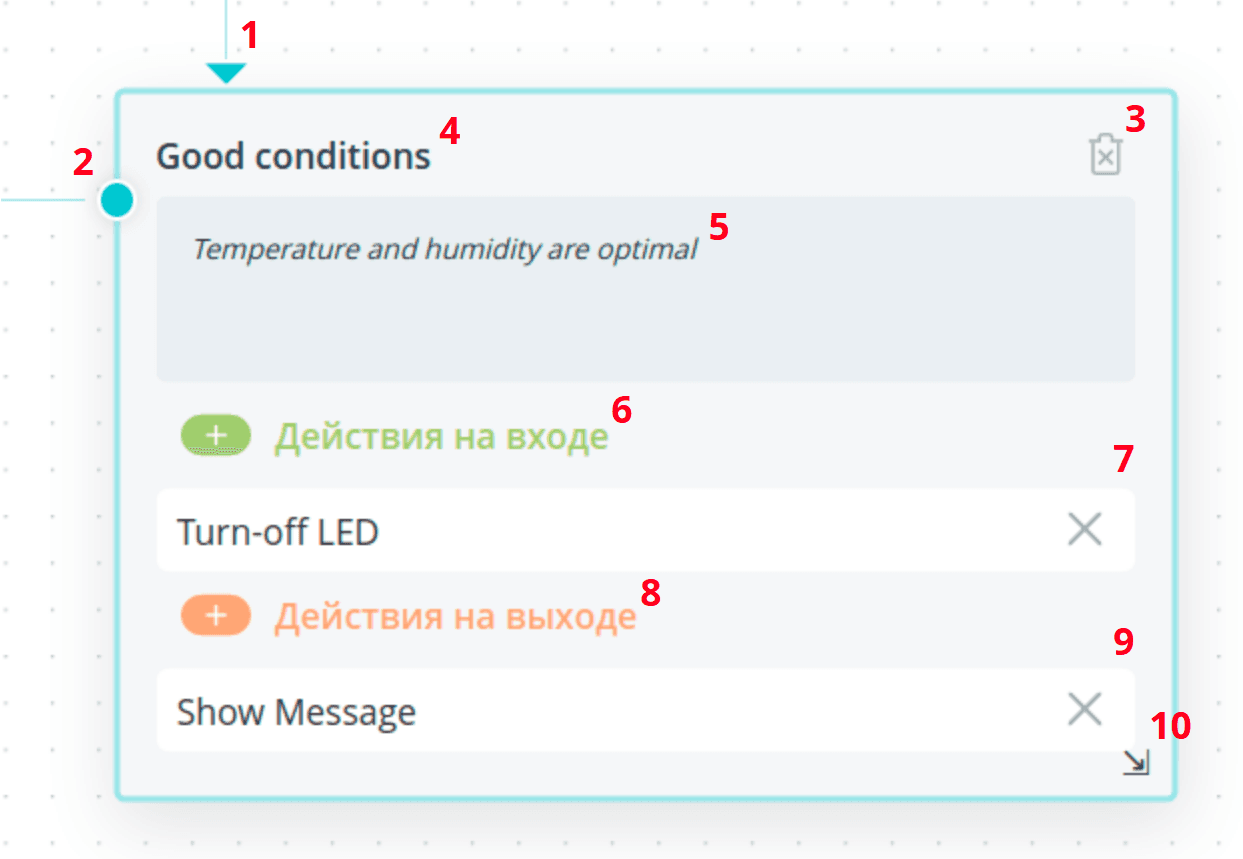
Transitions
To draw a transition between states, draw a dashed line from the boundary of the initial state to the boundary of the subsequent state.
of the initial state to the boundary of the subsequent state.
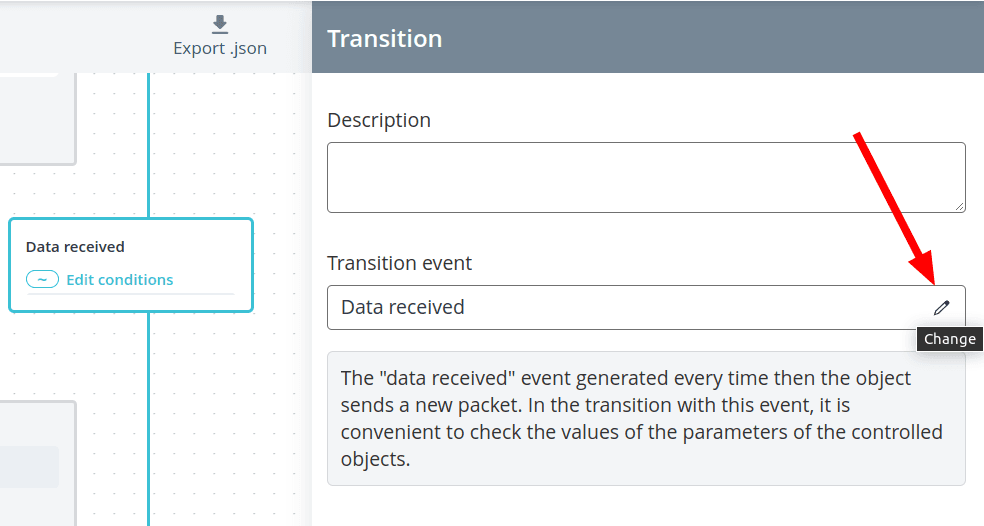
Transition interface
- Alignment of the transition between states
- Deleting a transition
- Event name
- Editing conditions
- Description of the specified conditions
- Changing the size of the transition
- Selecting the interaction of the following conditions
- Saving the conditions below
- Parameter to compare
- Comparison operation
- Argument options for comparison
- Adding condition
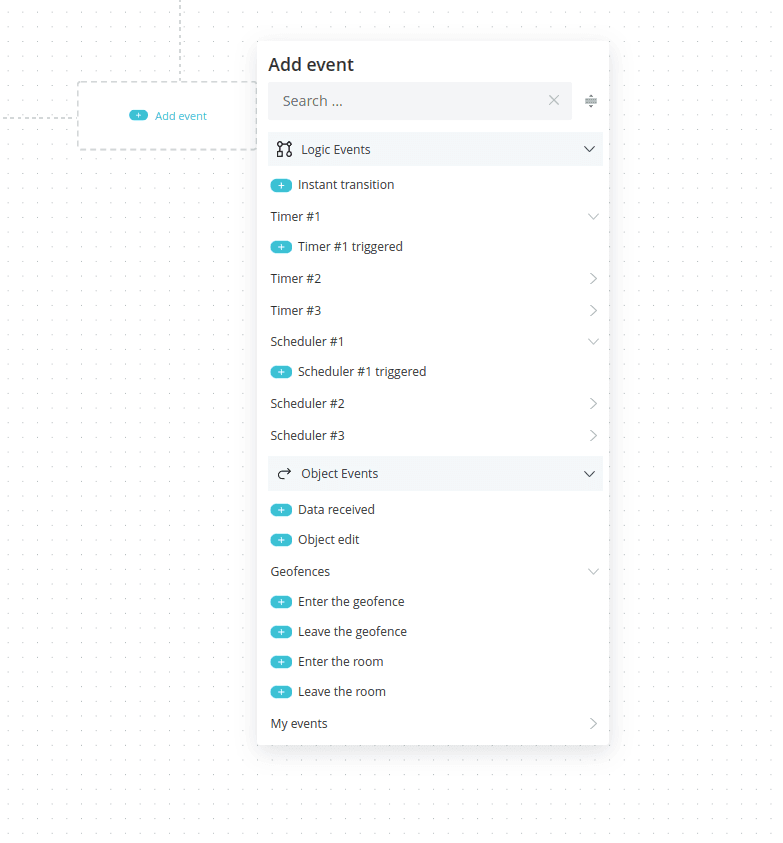
Events
In a transition, specify the event that must occur for the transition to take place.
Events are divided into two semantic groups:
- Auto events:
-
Instantaneous transition - the transition takes place immediately;
-
Timer No... - events in timers:
- Timer No... - the transition occurs when triggered started timer;
-
Scheduler #... - events in schedulers:
- Scheduler #... - transition occurs when triggered started scheduler.
- Object events:
- Received data - transition occurs when a data packet is received;
- Edit object - the transition occurs when changes are saved in the Edit tab of the object;
- Geozones - events in geozones:
- Entry into a geofence - transition occurs when entering a tracked geofence;
- Exit geofence - transition occurs when leaving the tracked geofence;
- Entering a room - transition occurs when entering a tracked room in the scheme;
- Exit Room - the transition occurs when leaving the tracked room on the schematic.
All the other sections you see in events are subsystems with those
events that you created in the model.
💡
Once an event is selected, it can be modified. To do this, click on the transition and
click on the button to modify the event. A drop-down list will appear to select
the desired option.
Terms
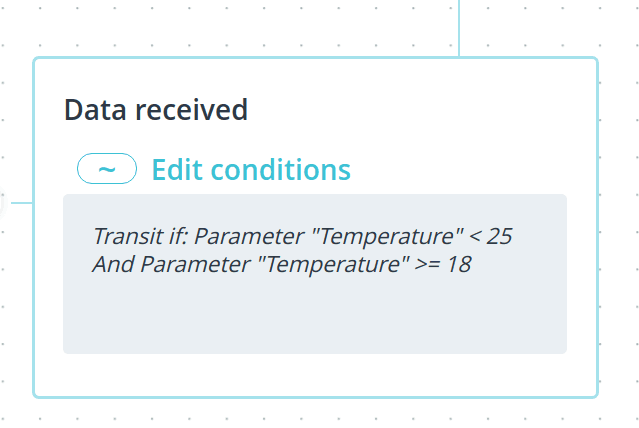
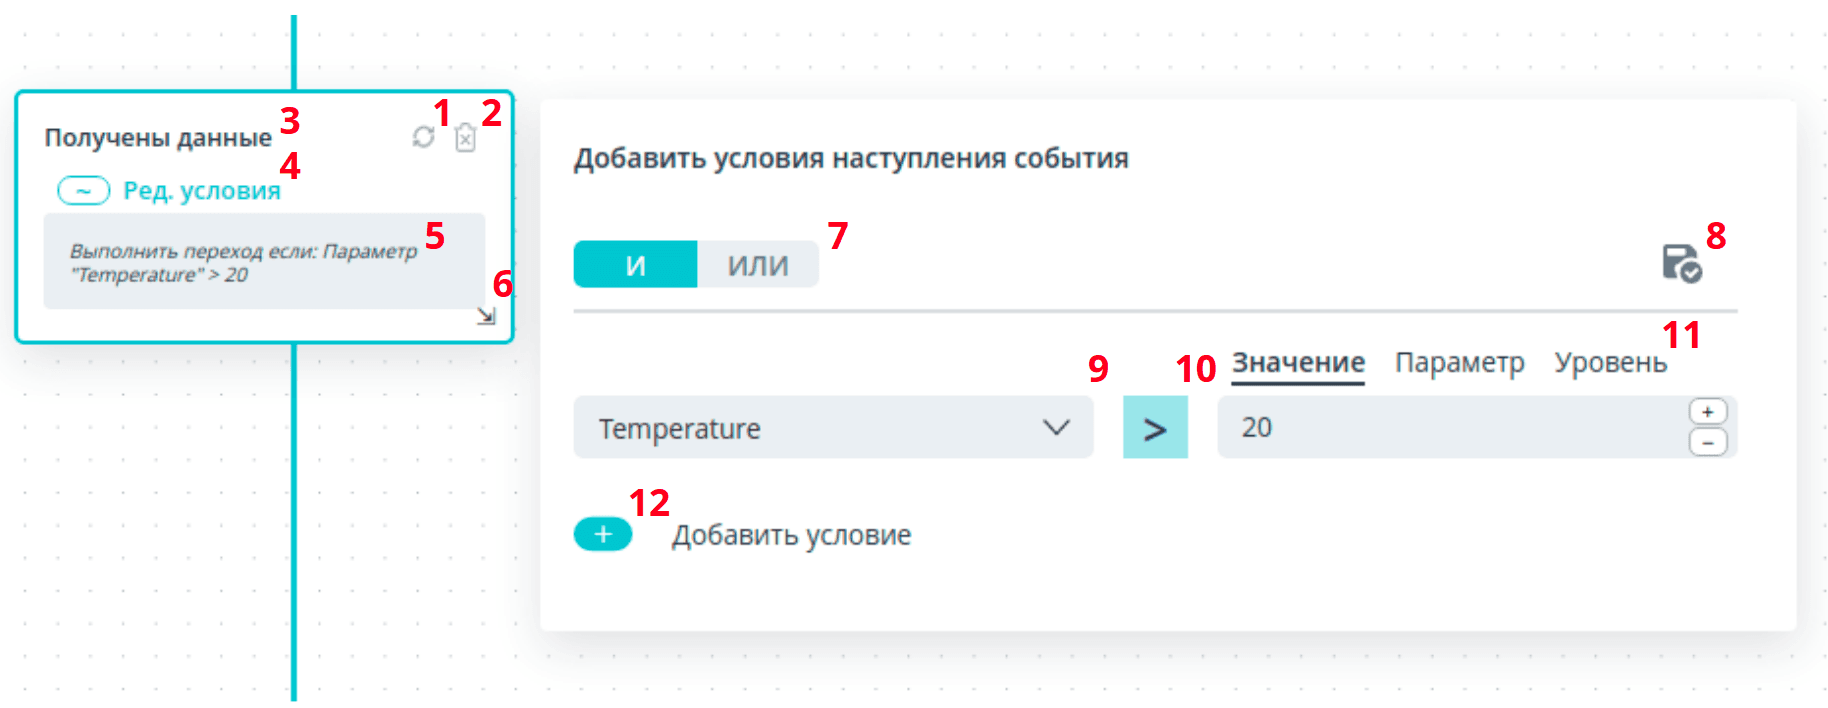
After selecting an event, you can additionally specify a condition, when it is fulfilled.
when the transition takes place.
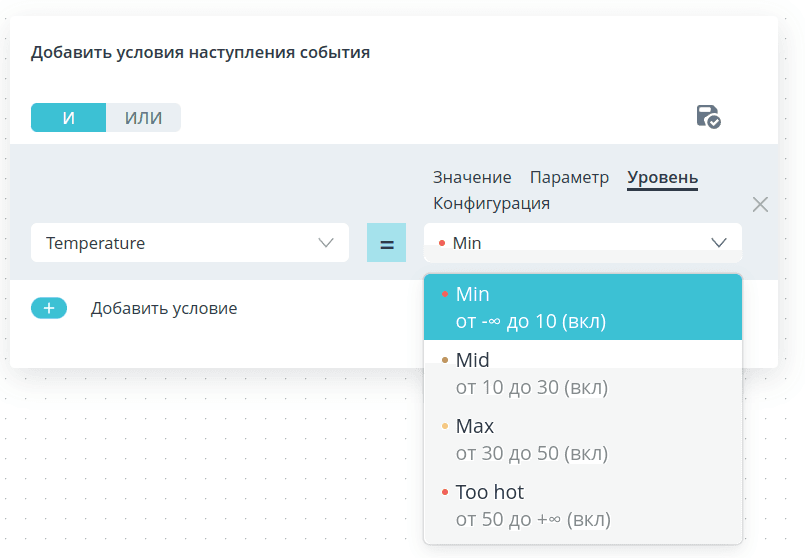
To form the condition, select the model parameter, the value of which you want to check, from the drop-down list.
to check from the drop-down list.
💡
When selecting a parameter from a large model, it is convenient to use the search.
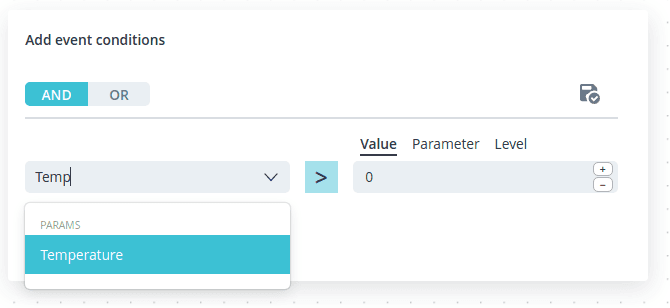
You can compare parameters with
- a specified value in the Value section,
- another parameter selected under Parameter,
- one of the levels of this parameter selected in Level,
- the configuration value selected in Configuration.
💡
Important:
The Level section appears only if
levels are set in the automaton model for the parameter selected on the left.
The Configuration section appears only if,
if the automaton model has parameters with type Configuration.
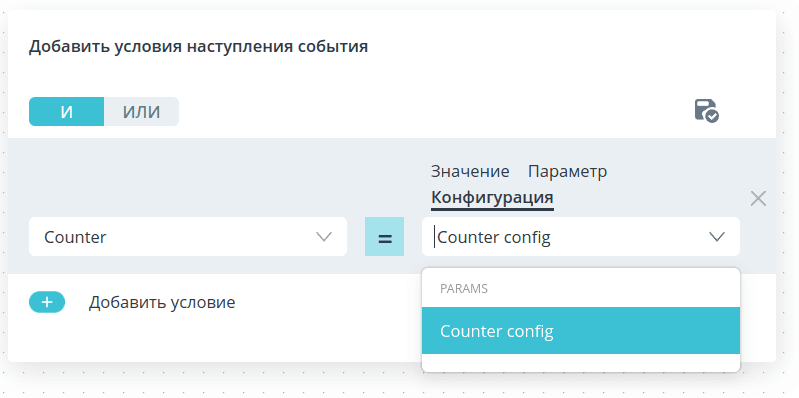
Select the comparison operation and after the condition is generated, click the
save button in the upper right corner of the Add Condition window.
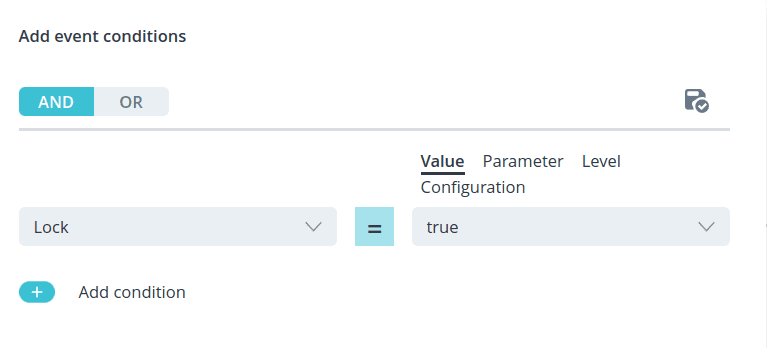
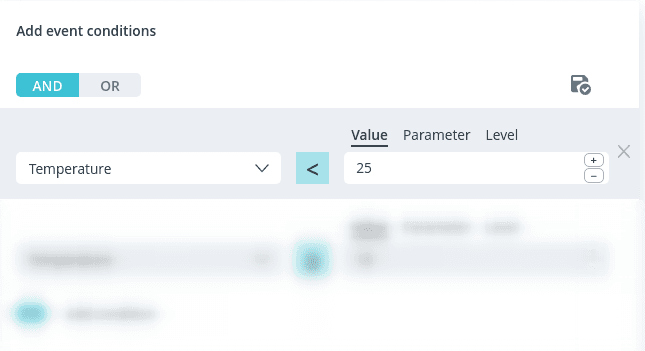
From one to four conditions can be set in one transition. Their interaction
configure their interaction with each other using the I and ILI buttons. If you select I
all conditions must be met for the transition to be executed, and when ILI is selected, any of them must be met.
any of the conditions must be met.
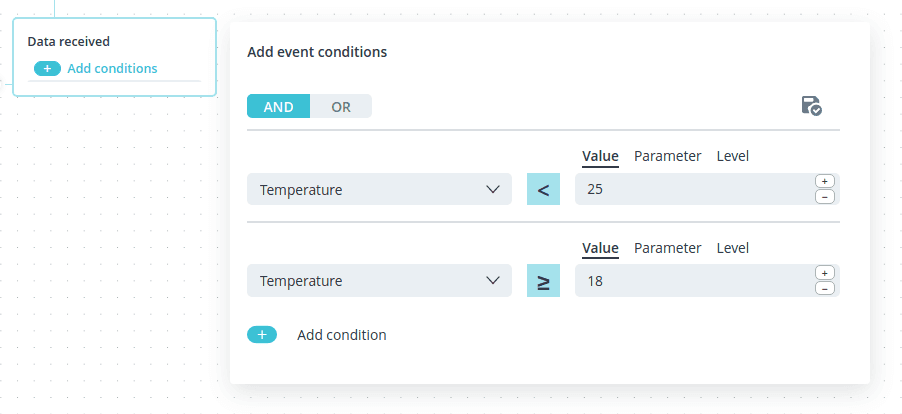
To remove one of the conditions, hover over it and click the cross.
Zoom in on the transition to see an automatically generated description
about the specified conditions.